Items to get:
– Arduino Uno
– LED strip lights (RGB)
– USB cable to connect Arduino
– Arduino jumper wires
– Soldering iron/solder
It’s relatively affordable if you shop around online for deals, but I won’t do an exact breakdown. You could even opt for knockoffs at your own risk since the technology really isn’t that advanced.
Download Arduino and plug your device into your computer via USB. Sketch->Include Library->Manage Libraries and search for “fastLED” and install it. Source code (just a skeleton project I found online):
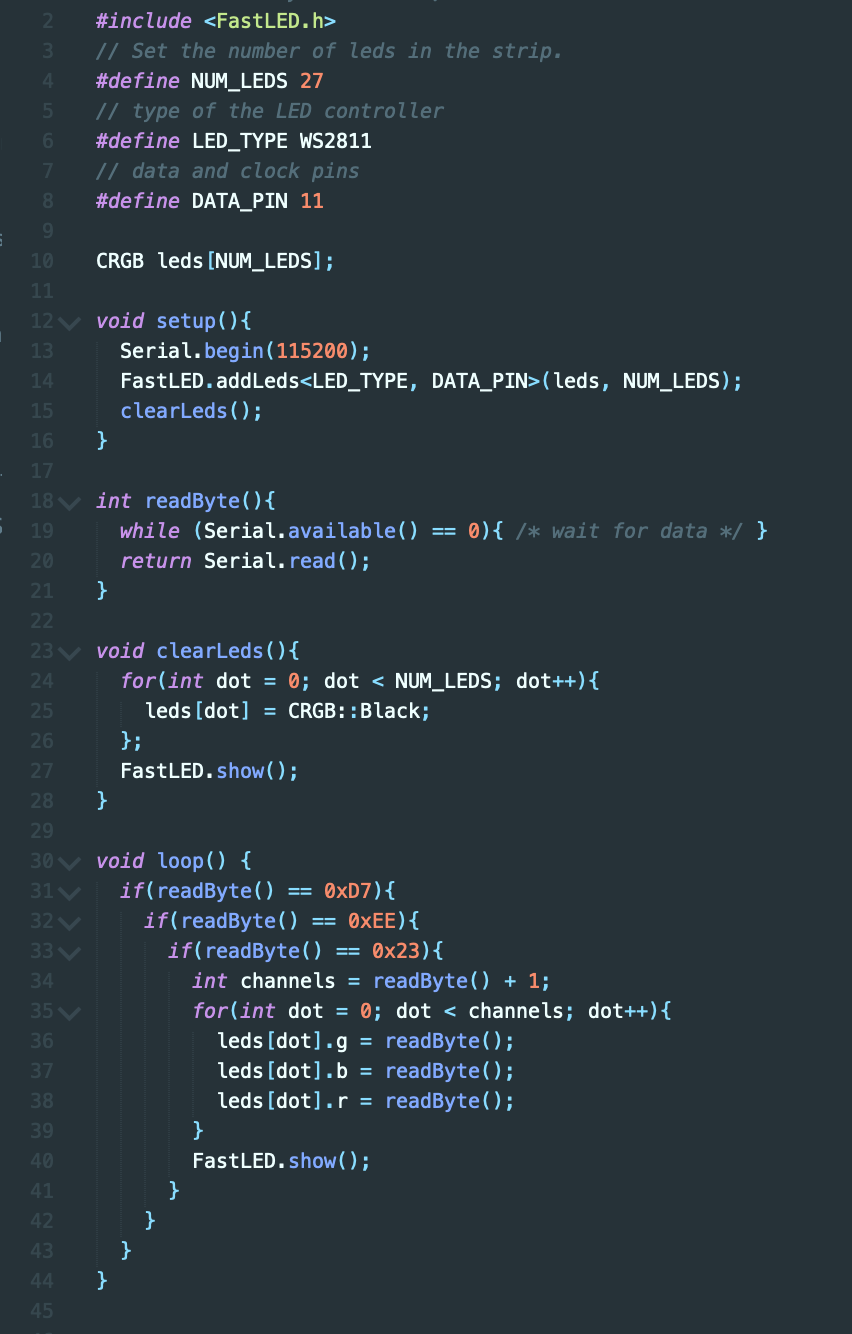
Note: some changes will need to be made such as “#define NUM_LEDS 27” since LEDs per chip may vary across different hardware. “#define LED_TYPE WS2811” may also be incorrect, again, depending on the hardware that you purchase. Verify and upload upon completion.
Cut your light strip and be extra careful in cutting it along a connection point.

I personally keep the power adapter and Arduino on the same side but this isn’t terribly important. If they are on the same side, then you must wire it to the side that says “DI” (i.e. DATA IN). For WS2811 lights, you will have 3 pins on the light strip.
Upon selecting the side where the power adapter will be placed, you must then solder the negative wire from the adapter to “GND” (i.e. ground) and the positive wire to +12V. The negative will be black and the positive will be red or white. On the “DI” side you will then need to solder 2 jumper wires to the DI and GND. Now you can mount your LED strip to your liking but currently there will be no way to control the lights.
Just a quick aside: mounting shouldn’t be difficult, arguably one of the easiest steps in this process but I don’t like committing to a single location for LED strips so I typically use command strips that you can essentially thread your light strip through.

You can pick this up at Home Depot or even Kroger (where I got mine).
Atmowin (https://www.dropbox.com/s/73ihdd88pss0ppf/Atmowin.zip?dl=0) is a great start albeit a bit daunting when initially opening the program. Under “Device” select “AtmoDuino v2” and configure the device by entering in relevant information based on your hardware (e.g. number of LEDs). Go to Effect Active and select “Live.” Under “Zones Top,” “Zones Left/Right,” and “Zones Bottom” we need to enter the LEDs accordingly. A bit more tweaking and we’ll get start seeing some magic.
Next, click on “Change channel assignments” and rename the mapping to something that isn’t “Standard.” Now you have to figure out the directionality of your LEDs based on how it physically configured. The LEDs are enumerated (e.g. LED[1], LED[2], etc.).
The following settings are customizable but may take a fair amount of time to suit your preferences:

Now you should fix the colors by selecting “Configure software adjustment.” Under “Software Gamma adjustment” you can play around with “Global” settings to try to get more accurate colors that match your monitor. The orders for the colors may vary for the LED strips which can also be manipulated as follows by simply shifting the numbers until the colors are correctly rendered:

There may be a delay depending on the capture frame rate and on part due to the fact that the LEDs come in 3s which means they can’t be adjust individually which may appear to “jump around” more sporadically than you’d like. There is a lot I would like to learn, although from some light reading I’ve found music visualization to be ambitious (while I was brainstorming for project ideas at the beginning of the semester).